The Ultimate Guide to Choosing and Using a Leveling Line Laser for UK DIY Projects
A practical buyer's guide and hands-on walkthrough for British homeowners and tradespeople — covering kitchen fitting, Victorian floor tiling, and shelving on dodgy masonry walls with precision laser tools.
What Is a Leveling Line Laser and Why Does It Matter?
A leveling line laser projects a perfectly horizontal or vertical reference line onto walls, floors, and ceilings — giving you a visible guide accurate to within ±2mm over 10 metres. That's the short version. The longer version? It replaces spirit levels, chalk lines, and the guesswork that turns a simple shelf installation into a three-hour argument.
I've been doing bits of electrical work and general DIY around Belfast for years now. Older terraced houses up the Antrim Road — you know the type — nothing's plumb, nothing's level. A decent self-levelling laser line tool changed how I approach every job. Honestly, going back to a bubble level feels like going back to dial-up internet.
These tools work by using an internal pendulum or electronic sensor that automatically finds true level within a range of about 3–4°. Point it at a wall, switch it on, and you've got a crisp reference line in seconds. No second pair of hands needed.
Why British Homes Demand a Leveling Line Laser
UK housing stock is old. Properly old. Around 38% of homes in England were built before 1946, according to government housing data. That means uneven plaster, walls that lean, floors with a noticeable slope from one end of the room to the other. A standard spirit level only tells you what's happening across 600mm or 1200mm. A laser projection covers the entire wall — 3, 4, even 15 metres — in one go.
The Problem with Victorian and Edwardian Properties
Solid masonry walls move over decades. I've measured deviations of 12–15mm across a single 3-metre kitchen wall in a house off the Cavehill Road. Try fitting a run of base units to that without a full-room reference line. You can't. Well, you can — but you'll be shimming every single cabinet and the worktop will look like a rollercoaster.
New Builds Aren't Perfect Either
Don't assume new builds are sorted. Plasterboard finishing tolerances allow up to 5mm deviation over 2 metres under normal standards. That's enough to make a row of floating shelves look wonky from across the room. A cross-line laser tool catches these issues before you drill a single hole.
Key Features to Compare When Choosing a Leveling Line Laser
Not all laser levels are equal. Here's what actually matters when you're spending your own money — and I've wasted cash on cheap ones, so trust me on this.
Green Beam vs Red Beam
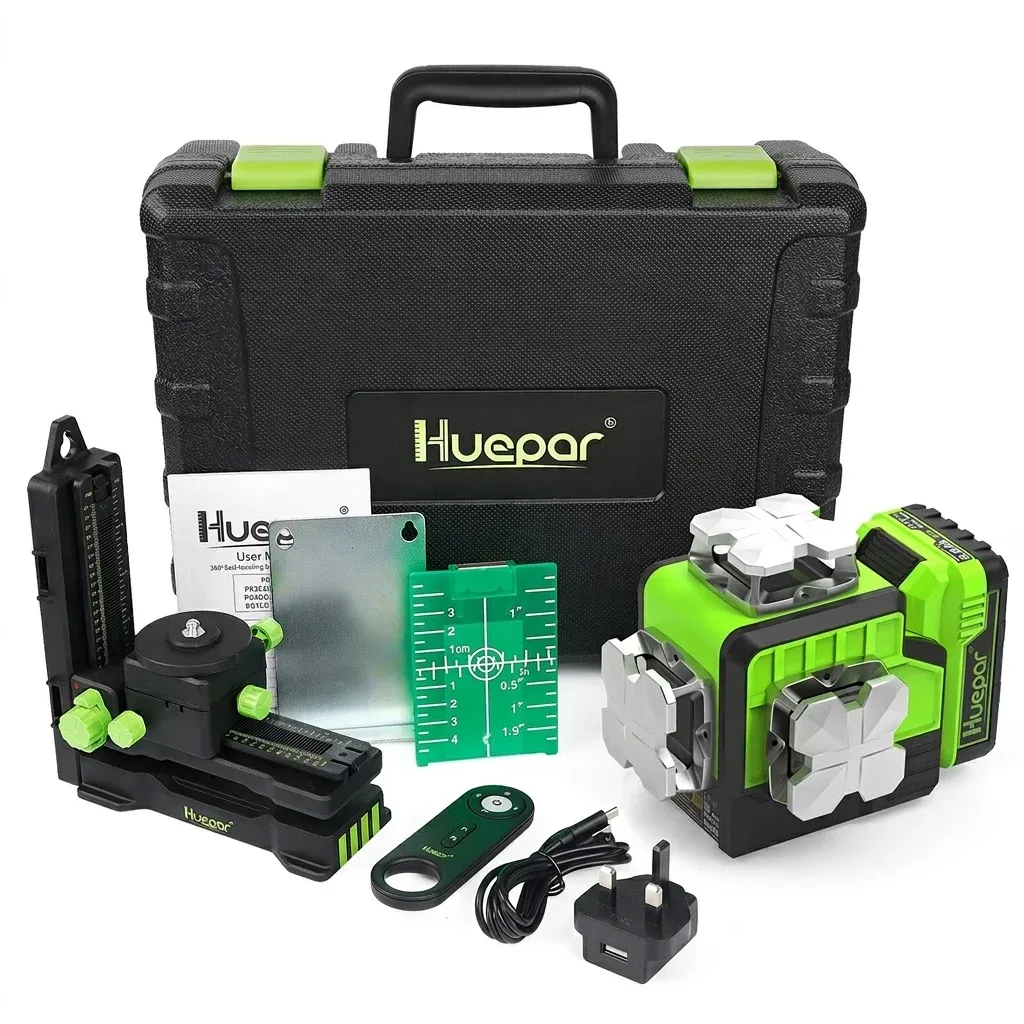
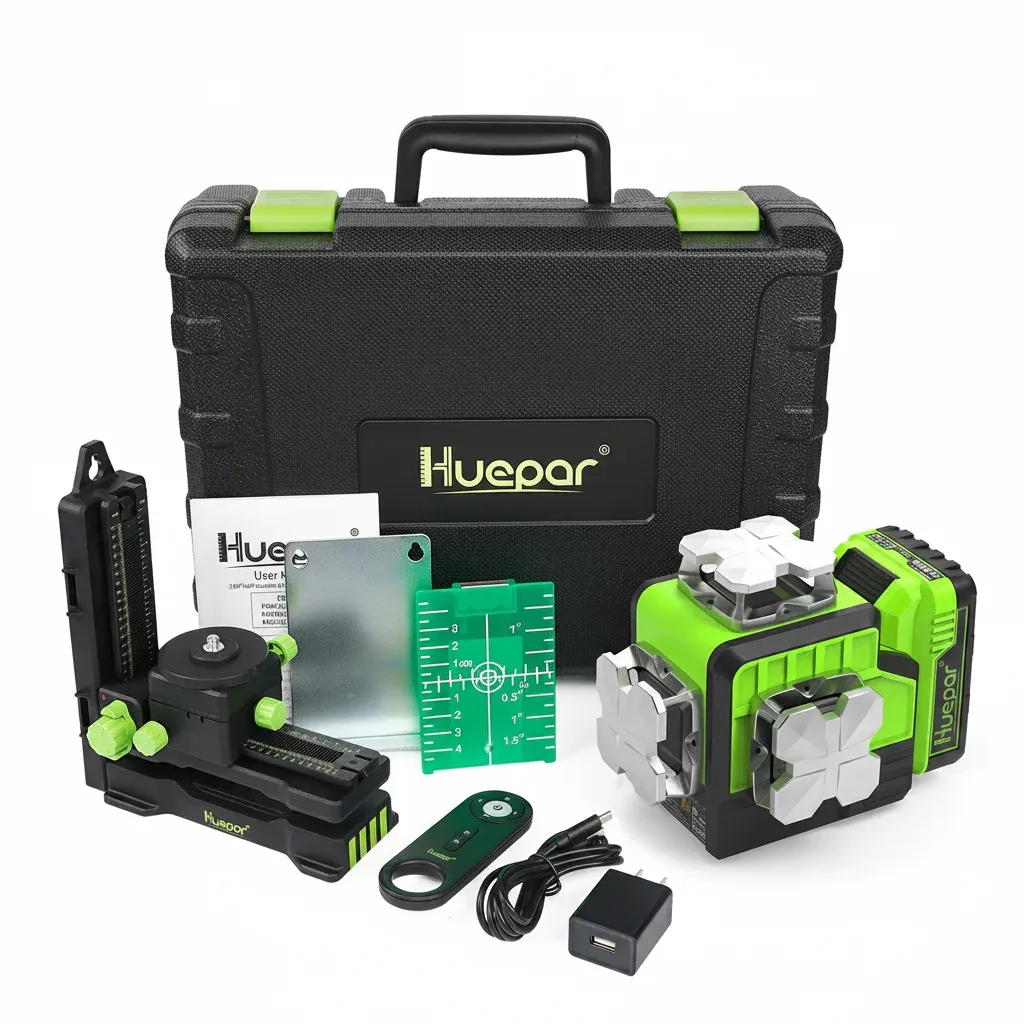
Green beams are up to 4x more visible to the human eye than red. In a bright kitchen with south-facing windows? Red disappears. Green stays visible. Worth the extra spend? Absolutely, especially for daytime indoor work. The Hueparll 12-line green beam model at £179.99 uses green diodes specifically for this reason.
Number of Lines
A single cross-line (1 horizontal + 1 vertical) handles most shelf and picture-hanging jobs. For full kitchen fitting or tiling an entire room, though, you want a 360° multi-line laser that projects references across all four walls simultaneously. Saves you repositioning the unit constantly.
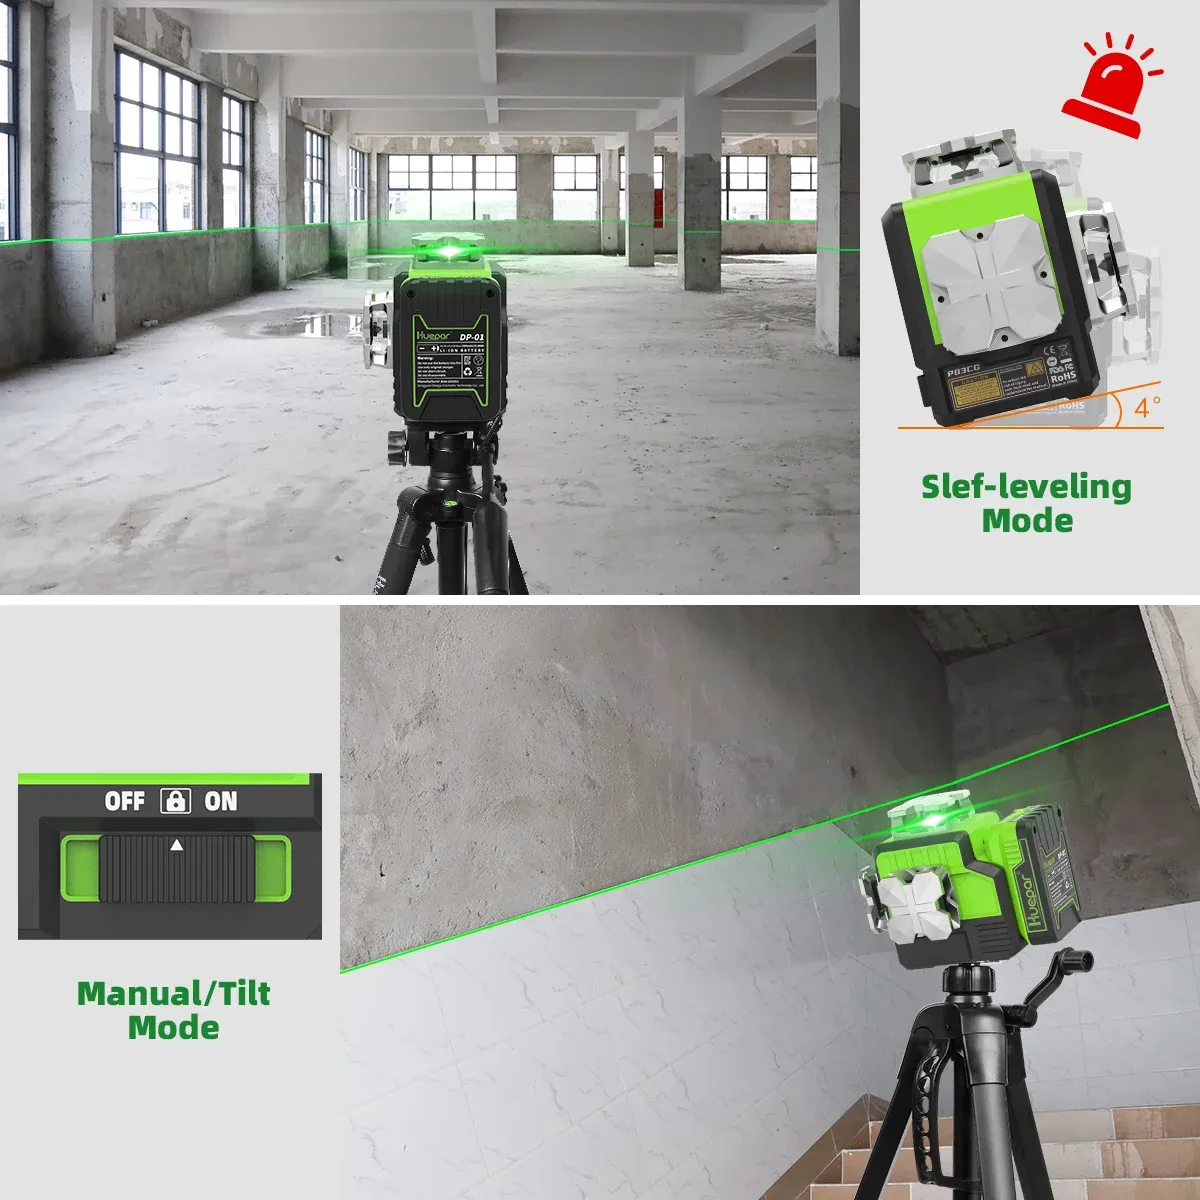
Self-Levelling Range
Most decent units self-level within ±3° to ±4°. If your floor slopes more than that — and I've seen it in some older Belfast properties — you'll need to manually adjust the tripod first. The unit will flash or beep if it can't compensate.
Accuracy Rating
Look for ±2mm at 10m as a minimum for DIY. Professional units hit ±1mm at 10m. Over a typical 4-metre UK room, that's less than 1mm of error. Spot on for kitchen fitting and tiling work.
Leveling Line Laser Comparison: What's Available in 2026
Here's how the main options stack up for UK buyers this spring. I've focused on units that actually suit British home improvement rather than commercial site work.
| Feature | Hueparll 12-Line Green Beam | Budget Red Beam (Typical) | Premium 360° Unit |
|---|---|---|---|
| Price | £179.99 | £40–£70 | £300–£500 |
| Beam Colour | Green (532nm) | Red (635nm) | Green (520nm) |
| Number of Lines | 12 lines (3 x 360°) | 2 lines (1 cross) | 12–16 lines |
| Self-Levelling Range | ±3° | ±4° | ±3° |
| Accuracy | ±2mm at 10m | ±3mm at 10m | ±1mm at 10m |
| Indoor Range | 25m | 10–15m | 30m+ |
| Battery Life | 4–5 hours | 8–10 hours | 3–4 hours |
| UK Warranty | 3 years | 1 year | 2–3 years |
The sweet spot for most people? That mid-range bracket around £150–£200. You get builder-grade precision without paying for features you'll use twice a year. The Hueparll 360° laser level range sits right in that zone — 12 lines covering the full room, green beam visibility, and a 3-year warranty. Decent bang for your buck.
So what's the catch with budget models? Visibility, mainly. A £45 red beam laser is fine in a dim garage. Try using it in a sunlit conservatory or a white-walled kitchen and you'll be squinting at nothing. I learned that the hard way.
Using Your Laser Level for Common UK Tasks
Kitchen Fitting on Uneven Walls
This is where a leveling line laser earns its keep. Set the unit on the floor or a tripod at worktop height (typically 910mm from finished floor level). Project a 360° horizontal line around the entire room. Now you can see exactly where every wall deviates from level — and plan your scribe cuts and packing accordingly.
For a standard UK kitchen with 600mm-deep base units, I mark the wall at the laser line, measure down to the floor at 300mm intervals, and find the highest point. That's your datum. Everything gets set from there. Takes 10 minutes and saves hours of faffing later. For a detailed walkthrough, check the Hueparll guide on how to use a laser level.
Tiling Victorian Floors
Victorian geometric tiles need precise centre lines. The rooms are rarely square — I've measured one in East Belfast that was 22mm out of square over 3.5 metres. Project two perpendicular vertical lines down onto the floor from a 360° unit mounted on a tripod. These give you your starting cross. Dry-lay from the centre outward and you'll get even cuts at the edges rather than a thin sliver on one side.
Shelving on Masonry Walls
Old brick and block walls are murder for shelving. The plaster thickness varies, the wall itself might bow, and your drill bit wanders on the mortar joints. A vertical laser line gives you a plumb reference for bracket spacing. The horizontal line — well, that's obvious. Level shelves. Here's the trick, though: project the line, mark your fixings, then switch to vertical mode to check your rawlplug positions aren't landing on a mortar course where they'll pull out under load.
Hanging Radiators and Towel Rails
Bathroom refits. Every plumber I know eyeballs radiator brackets. Then the homeowner notices one end is 3mm higher. A quick horizontal reference line at bracket height sorts this in seconds. Particularly useful for long radiators — 1200mm and above — where even small errors are visible.
Setup and Accuracy Tips for Best Results
Owning a self-levelling laser is one thing. Getting accurate results from it requires a bit of know-how.
Positioning Matters
Place the unit as close to the centre of the room as possible. Laser accuracy degrades with distance — ±2mm at 10m means ±4mm at 20m. In a typical 4m x 5m UK room, a central position keeps you within 2.5m of any wall. That's sub-1mm accuracy everywhere that matters.
Let It Settle
Self-levelling pendulums need 3–5 seconds to stabilise after you switch on. Don't mark anything until the line stops wobbling. On a vibrating floor — above a busy road, say — give it 10 seconds. (Living above a main road is character-building in other ways too, but that's a separate problem.)
Temperature Considerations
Laser diodes perform best between 5°C and 40°C. In an unheated UK garage in January, you might notice the beam dimming slightly. Bring the unit inside for 10 minutes to warm up if it's been in the van overnight. Most modern green beam units handle cold better than the older red ones — but it's still good practice.
Checking Calibration
Every 6 months, do a simple check. Project a horizontal line, mark both ends of a 5-metre span. Rotate the unit 180° and project again. If the marks don't align within 2mm, your unit needs recalibrating. Most manufacturers offer this service — hueparll includes it within their 3-year warranty period.
Safety and UK Standards for Laser Levels
Laser levels sold in the UK must comply with BS EN 60825-1 for laser safety classification. Most DIY and trade units are Class 2 (output below 1mW), which means they're safe for incidental eye exposure — your blink reflex protects you. That said, don't stare directly into the beam. And keep them away from children and pets.
The Health & Safety Executive (HSE) provides guidance on laser use in workplace environments. For domestic DIY, Class 2 units don't require special precautions beyond common sense. If you're using one on a building site with other workers, you should display laser warning signs — that's a legal requirement under the Control of Artificial Optical Radiation at Work Regulations 2010.
When buying, check for CE/UKCA marking. Since January 2025, products sold in Great Britain need the UKCA mark, though CE marking remains accepted under transitional arrangements through 2027. The British Standards Institution (BSI) maintains the relevant product safety standards. Any reputable brand — including the professional-grade options reviewed on Hueparll — will carry proper certification.
Frequently Asked Questions
How accurate is a leveling line laser for kitchen fitting?
A quality self-levelling laser delivers ±2mm accuracy at 10 metres — more than sufficient for kitchen fitting where cabinet tolerances are typically 3–5mm. Over a standard 3-metre kitchen wall, you're looking at less than 1mm of deviation. That's tighter than most spirit levels can reliably achieve across the same distance.
Can I use a laser level outdoors in the UK?
Yes, but visibility drops significantly in daylight. Green beam units are visible up to 10–15m outdoors on overcast days. For bright conditions, you'll need a laser detector (receiver) which extends the working range to 50m+. Red beams are essentially invisible outdoors without a detector. Budget £30–£50 for a compatible receiver unit.
What's the difference between a cross-line laser and a 360° laser level?
A cross-line laser projects one horizontal and one vertical line on a single wall — covering roughly 120° of arc. A 360° unit projects lines around the entire room simultaneously, eliminating the need to reposition. For single-wall tasks like shelving, a cross-line is fine. For full-room work like kitchen fitting or tiling, 360° coverage saves significant time.
How long do laser level batteries last?
Battery life varies from 4 to 12 hours depending on the number of active lines. The Hueparll 12-line unit runs approximately 4–5 hours with all lines active, or 8+ hours using selected lines only. Most modern units use rechargeable lithium-ion batteries. Carry a USB power bank as backup for full-day jobs — most units charge via USB-C in 2026 models.
Do I need a tripod with my leveling line laser?
Strongly recommended but not always essential. Most units have a flat base for floor or shelf placement. A tripod lets you set the laser at exact working height — critical for kitchen worktop lines (910mm) or dado rail positions (900–1000mm). A basic aluminium tripod with 1/4"-20 thread costs £15–£30 and makes a noticeable difference to usability and accuracy.
Is a £180 laser level worth it for occasional DIY?
If you're fitting a kitchen (saving £500+ on installation labour), tiling a bathroom, or doing regular shelving and picture hanging, a £180 unit pays for itself on the first major project. For truly occasional use — one shelf a year — a £50 cross-line laser does the job. The mid-range sweet spot suits anyone doing 3+ projects annually.
Key Takeaways
- Green beam visibility is essential for daytime work in bright UK kitchens and living spaces — red beams disappear in natural light.
- ±2mm accuracy at 10m is the minimum standard for kitchen fitting, tiling, and shelving — the Hueparll 12-line unit at £179.99 meets this comfortably.
- 360° projection eliminates repositioning and gives full-room reference lines for complex jobs like kitchen installations on uneven walls.
- UK housing stock demands laser precision — with 38% of English homes pre-1946, spirit levels simply can't cover the deviations across full wall spans.
- Self-levelling compensates for sloping floors within ±3–4°, handling most domestic situations without manual adjustment.
- Check UKCA/CE marking and Class 2 laser safety rating before purchasing — these confirm compliance with BS EN 60825-1 and UK product safety law.
- A leveling line laser pays for itself on one kitchen fit — saving hours of measuring, re-measuring, and correcting mistakes that a spirit level would miss.
Ready to upgrade your toolkit with Huepar UK?
Shop the Kit — £356.71